Learning HTML for Kids!

What’s on this page?
Chapter Twelve
Styles Part II
There are two more style elements I want to cover: text-
Text-
You can tell your browser to align your text to the right, to the center and to the left*. It’s all done with the text-
It’s pretty simple. Let’s add it to the code we’ve done so far.
Step One
Open style.html. Add the highlighted code listed below.
<!DOCTYPE html>
<head>
<title>Styles</title>
</head>
<body>
<h1 style="color:red;font-
<h1 style="font-
<h1 style="color:blue;font-
</body>
</html>
*Note: You really don’t have to enter text-
Step Two
Save the file.
Step Three
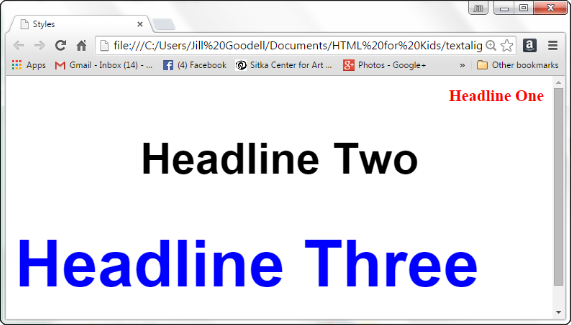
Go to where you saved the file and open it.Your browser should look like this. If not, you know what to do–go back and check your code.
Back-
The last style we will talk about is background-
<body style="background-
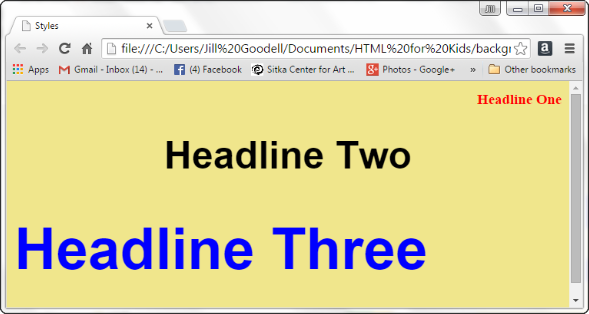
Let’s take the code from the page above and add some background color (see highlighted code). By now you should know how to open your style.html file and make the changes.
<!DOCTYPE html>
<head>
<title>Styles</title>
</head>
<body style="background-
<h1 style="color:red;font-
<h1 style="font-
<h1 style="color:blue;font-
</body>
</html>
Save the file again and open it up in your browser to see what it looks like:
If we wanted to change the red title to white, how would you change the code?
Style Syntax
Remember that all those punctuation marks are important when you are writing your code. In the Style attribute, you have to remember:
- the equal sign after the word style (=),
- to include your value (color, size, etc) in quotation marks (“),
- to separate each command with semi-
colons (;), - to end the opening tag with an angled bracket (>).
Remember, one missing mark and your page won’t display properly.
Cascade Style Sheets (CSS)
When I originally wrote this tutorial back in 1998 for my son’s fifth-
In the meantime, a group of very smart folks came up with an idea. Why not create a file that contained formatting code that could be used throughout the whole website. Thus, the birth of CSS.
There are three ways to “style” with CSS:
Inline
We have already done this in Chapters 11 and 12, by using the style attribute .
Internal
You list all your formatting by using the <style> element and placing it in the <head> section of the code.
External
You can create a separate file and link it to the webpage or website. This is recommended for a multiple-
For more information on CSS go to the Resources page.
Privacy Statement
Learning HTML for Kids
© 1999-
More Styles
style=
text-
background-
Cascade Style Sheets