Learning HTML for Kids!

What’s on this page?
Chapter Six
Making a list and checking it twice
People are usually in a hurry when using the Web. This behavior may be a carryover from when folks used to pay for the actual time spent on the Internet. Back in the olden days, users did not have the luxury of unlimited time on the Web. So they would quickly go online, get the information they needed and sign off. In this way, the user just paid for the little time used.
Things are different today. Mostly everyone has unlimited time access to the Internet, but the behavior hasn’t changed much. People are still in a hurry, and they don’t like to read a lot of text. So putting your information in the form of a list seems to help.
Lists come in a variety of forms with most either numbered or bulleted. The numbered lists are called ordered lists and the bulleted lists are unordered lists.
Lists are nested. There is a tag that identifies the type of list, like numbered or bulleted. Then within that tag there is another tag that itemizes the list. Maybe some definitions would help.
<ol>…</ol>
The ordered list is a container tag and is used for numbered lists.
<ul>…</ul>
The unordered list is a container tag and is used for bulleted lists.
<li>…</li>
The listed item tag is a container tag and is nested within the ordered or unordered tags.
Here is an example of the differences between ordered and unordered lists.
An ordered (numbered) list goes like this:
<ol>
<li>My first item on the list.</li>
<li>My second item on the list.</li>
<li>My third item on the list.</li>
<li>My fourth item on the list.</li>
</ol>
In the browser it will appear like this:
1. My first item on the list.
2. My second item on the list.
3. My third item on the list.
4. My fourth item on the list.
An unordered (bulleted) list goes like this:
<ul>
<li>My first item on the list.</li>
<li>My second item on the list.</li>
<li>My third item on the list.</li>
<li>My fourth item on the list.</li>
</ul>
In the browser it will appear like this:
- My first item on the list.
- My second item on the list.
- My third item on the list.
- My fourth item on the list.
Let’s add a list to our story about Muffins. I will be adding:
I left the pound with my new mommy and new sister, Maria. They took me straight to the pet store to buy:
- A kitty baby bottle and formula
- A small cloth toy
- Litter box with litter
- Food (for later)
Mom and sis had to feed me by bottle because I was so young.
Notice we have added two new paragraphs and a list. So let’s add that to our code.
Step 1
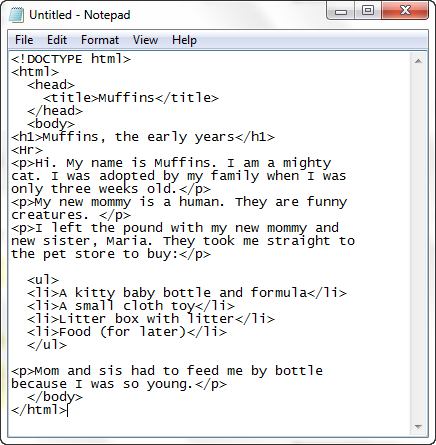
Open your text editor and open muffins.html. If you can’t see the file, you may have to enter the filename. Add the text and code listed in yellow below.
<!DOCTYPE html>
<html>
<head>
<title>Muffins</title>
</head>
<body>
<h1>Muffins, the early years</h1>
<Hr>
<p>Hi. My name is Muffins. I am a mighty
cat. I was adopted by my family when I was
only three weeks old.</p>
<p>My new mommy is a human. They are funny
creatures. </p>
<p>I left the pound with my new mommy and
new sister, Maria. They took me straight to
the pet store to buy:</p>
<ul>
<li>A kitty baby bottle and formula</li>
<li>A small cloth toy</li>
<li>Litter box with litter</li>
<li>Food (for later)</li></ul>
<p>Mom and sis had to feed me by bottle
because I was so young.</p>
</body>
</html>
It should look like this in your text editor:
Step 2
Go to the file and open it. What do you see now?
Is it something like this? If not, go back and check your code.


Wow! You did it. Good work. You’ve learned a lot so far. Maybe it’s time to review before we go on to pictures and links.
Privacy Statement
Learning HTML for Kids
© 1999-
Lists
Unorders & Ordered
<ol>…</ol>
<ul>…</ul>
<li>…</li>
Web structure